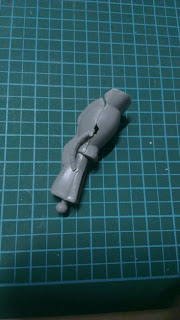
Mystery solved !!
Started working on these kits after the unboxing and completed the pending part of the PG Astray Red Frame. Removed the parts from the runners into their respective container. This time instead of keeping different parts of the models in different containers, I kept all in the same container. The parts are easy enough to differentiate without any having any confusion.
Being curious about the scale of this kit, I did a quick snap fitting (after removing nub marks) to see how big the final kit will be and also how the odd colors come together. First thing I did was to attach the right hand onto the body, adjusted it a little and to my horror this is what happened:
Dislocation of shoulder
At this point, I thought of throwing in the towel and dumping this kit into the nearest bin. After a few minutes of doing some deep relaxing breaths, I calmed down and started to snap the other pieces together and this is the result:
Front and back view of the Zaku II
Details are not there and the color for this kit is totally off. The peg on the right had is still broken. Time to see how tall this model will be when it is completed. 2 boxes on the cutting mat is equivalent to 1 cm. From the second picture, you can see that this Zaku model is 9 cm tall (including the antenna).
Since the height of Zaku II is 17.5 meter (from Gundam Wikia) and using the scale convertor found online, I can now slowly try to figure out the scale. First thing first before anything can be done is to convert from meters to inches. Found out that the Zaku II height is 17.5 meters, converting to inches would mean the height is about 688.98". Since the model height is 9 cm, all I have to do is use the scale up convertor (at the bottom) to do some trial and error to get to the exact or closest scale.
After a few tries, the closest number to 688.98" was 194.4. Finally I can put a scale onto this model.
Scale convertor print screen
While I was trying to let the Zaku II hold the rifle, the back of the rifle has to be bent. After removing it from Zaku, I found some stress marks on back portion of the rifle. I hope a painting the rifle black will help to cover the stress mark.
Stress marks on the rifle
After getting the height of the Zaku, I started to dismantle the model and I accidentally put too much pressure on the leg and I broke the energy cable at the side of the leg. I guess this is another piece I have to glue together.
With 2 pieces to glue back, I went to look for my trusty 3 second glue or commonly known as CA or super glue. This glue first made its appearance when I was working with the SD Epyon by Silver Castle.
3 second glue to the rescue
Since the piece for the should joint is so small, I tried to put as small a drop as I possibly could on the broken joint and carefully held it into place. When glue is dry, I drip more glue at the surrounding area just to make sure that the part is securely glued in place.
Front and back view of the part after the surgery
The gluing of the energy cable for the leg uses the same method mentioned. Now to wait for the glue to dry and I can start the painting process of this kit. I plan on using green as the base and slowly add in other colors. So while waiting for the glue to dry and for a nice weather to paint, I will start work on the Gyan and see if it has the same scale as the Zaku.


No comments:
Post a Comment