Showing posts with label d-style. Show all posts

Wednesday, December 25, 2024

D-Style Shield Liger - WIP 7 (Final)

 Too Cute To Resist

Merry Christmas and a Happy New Year to everyone!!

As this is a Christmas post, will complete the Shield Liger and let it celebrate Christmas with its friend, Gustav

Continuation from the previous posting, this post will start by putting the Shield Liger together.

Completed parts of the Shield Liger waiting for final assembly


Sunday, December 22, 2024

D-Style Shield Liger - WIP 6

A Painful Assembly

All the painting work completed in the previous posting, will be putting together the kit starting with the feet. The first section is the paws and already has me stumped. 


All the parts for the hind leg

[Paws]


These are the 2 parts which made me wonder about the fitment between painted and unpainted kit

Monday, December 16, 2024

D-Style Shield Liger - WIP 5

More Painting Ahead

Now that the main body has been completed, I shall use it as a template for the legs. This post will be painting the rest of the parts start with the weapons, tail, paws and finally the legs as there are a lots of minute details on them.

[Weapons]

Weapons for Shield Liger (Right to Left): Anti-Zoid (AZ) 3-Barrel Shock Cannon, AMD 20 mm 2-Barrel Beam Cannon and AZ 30mm 2-Barrel Beam Gun

Thursday, December 12, 2024

D-Style Shield Liger - WIP 4

 Making It More Visually Pleasing

Today's posting will start with the body of the Liger as the painting for the armor and pilot was completed in the previous posting. First order of business is to place all the pieces on the crocodile clips and satay sticks for ease of work during the painting process and to allow the paint to dry.


All parts painted with Steel which was used for the control sticks. Used a broader paint brush this round to see if there are any visible brush strokes when the paint has dried. Only the Anti-Zoid 3 barrel shock cannon piece and pipe were left unpainted

Sunday, December 8, 2024

D-Style Shield Liger - WIP 3

 It's Not Van Helsing, It's Van Flyheight

Having completed all the paint work for the Shield Liger armor it time to turn the attention to the cockpit.

Did a quick assembly to see how the cockpit will be with the pilot and noticed that there 2 control sticks on either side of the seat. Tried the steel color which will be used for the mechanical parts of the Liger. This will make the control stick stick out and show that it is a mechanical part and not part of the armor.

Mr.Hobby Mr. Color 28 Steel 

Monday, December 2, 2024

D-Style Shield Liger - WIP 2

 Holy Cow, That's A Lot Of Fine Details

Having completed 2 kits: RG GP01 and Kamiki Burning Gundam, 1 in mid build and now starting another, I feel "Operation Reduce Backlog" is off to a great start. Although the kits I brought over are small kits except for the PG Gundam Mk-II, it is still a good progress.

While removing the nub marks from the pieces, I couldn't stop being impressed on how much detail there are on the kit compared to SD Gundam kits. This will require a lot of detail painting to bring out its full potential which is a bit stressful and yet exciting at the same time.

   
Lots of pipes, hydraulics and even suspension springs for the leg

Sunday, November 24, 2024

D-Style Shield Liger - WIP 1

And The Winner Is ...

Before the completion of Kamiki Burning Gundam I was going through the backlogs I brought over to KL. Was torn between the D-Style Death Saurer, HMM Z KnightBB Shin Gouka Ryuusou Ryuubi and this kit. Decided to start this kit for a few reasons: 1) A breather from gunpla. 2) D-Style Gustav's platform is looking empty. 3) Perfect kit to try a new color. 4) Have most of the color required for the repaint of the kit. 5) Needed a distraction before I tackle the broken v-fin on the Kamiki Burning Gundam.

After looking at the photos of the Z-Knight from another fellow plamo blogger I might consider working on the Z-Knight the same time as the Shield Liger. The purpose of returning to the hobby is reduce the number of backlogs and to finish whatever paints I already have in my existing arsenal. Since this kit is mainly light blue and I have some leftover light blue rattle can, I can use that for the main body parts and for the rest of the parts will be brush painted with a color which I am curious about.

Thursday, February 25, 2016

D-Style Gustav - WIP 8 (Final)

Transport ready and waiting
 
With the platforms completed in WIP 7, let us link both together and connect them to the Gustav which was completed in WIP 6.

Linking the 2 platforms together is as easy as ABC. Just attach the peg into the hole and you are done.

Both platforms linked together

Platforms can be moved up or down
 
The same method is used to connect the platforms to Gustav.
 
Gustav connected to the platforms
 
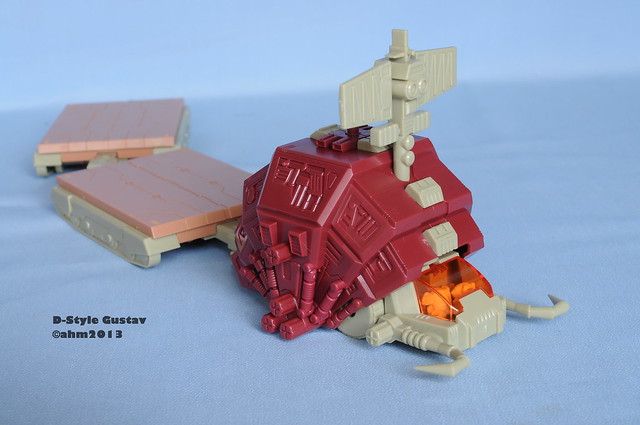
A little comparison between the original (right; Image taken from flickr) and the painted Gustav


Top and aerial view of the completed Gustav 
 
To conclude this review, below is a list of all the pros and cons and the conclusion of what I think about the kits according to my personal experience.

Pros:
+ Lots of details
+ Cute
+ Includes pilots
+ Moving wheels

Cons:
- Huge nub mark at the front
- Loose pieces
- Requires glue

Conclusions:
Overall, this is a nice and fun side project. There are a lot of details on the shell and at the platform area if you are willing to spend some time coloring them up. There is nothing much to be said about this kit. There are no articulation involved. The good thing is that the wheels do move.

While assembling this kit, it is best to have the hobby cement on standby. Not sure if I bought a faulty kit or if this is happening to other modellers as well. This is not a big issue though. Just be careful on where you hold the piece while putting the cement. 
 
All in all, I would highly recommend this kit. This is also a good kit for wetting your toes if you are planning to have some hand painting and masking practice.

All WIPs for the D-Style Gustav:
WIP 1 - Dilemma, dilemma, dilemma
WIP 2 - Just keep trying, trying, trying
WIP 3 -  Adding a little color here and there
WIP 4 - To paint or not to paint?
WIP 5 - D-style pilots
WIP 6 - Escargot anyone?
WIP 7 - Here comes the train

Saturday, February 20, 2016

D-Style Gustav - WIP 7

Here comes the train

With the completion of the Gustav in the previous post, this post will take a look at the assembly process of the platform/train.

Parts required for both the platform

Attach one side of the base to the platform

Friday, February 19, 2016

D-Style Gustav - WIP 6

 Escargot anyone?
 
With the painting completed about a month ago, it is time to revisit the Gustav for the assembling process.
 
The first step in the manual is to assemble the base.
 
Parts for the base

Pilots in their respective seats. It does look a bit cramp but I guess Moonbay and Fiona doesn't mind.

Monday, January 25, 2016

D-Style Gustav - WIP 5

D-style pilots?

In the last post, all the painting work for the Gustav has been completed. All that is left to do is spraying a layer of matte finish and painting of the pilots. There are 2 pilots provided with the kit. They are Moonbay and Fiona.
 
The first thing I did was panel line both the pilots using the Tamiya Accent Panel Line (Black). This will help determine the color separation later during the painting process. The first pilot to work on is Moonbay.
 
Moonbay panel lined and waiting

Tuesday, January 19, 2016

D-Style Gustav - WIP 4

 To paint or not to paint?

With all the major paint work completed in WIP 3, there is only box which requires my attention. I kept this last because it has the most parts but I did not notice that it contains the least amount of paint job to be done.

First thing I did was to separate the parts into different groups to get a better idea on what paint to be used on which parts.

Parts being separated
 
The first group selected are the wheels for the shell. The tyres are painted black while the rims are left in the Orchid.
 
Painted tyres

Monday, January 11, 2016

D-Style Gustav - WIP 3

 Adding a little color here and there
 
Now that the holiday season is over and RG Exia has been completed, I can resume working on the Gustav. In the previous Gustav WIP, I mentioned that I am 'thinking of painting the beige color of the snail to another color.' I decided to paint them Orchid which was last used on the SD Blaze Zaku Phantom. I have also changed the platform color from beige to brown.
 
All necessary parts painted Orchid and brown for the platform
 
While waiting for the paint to cure, I started adding more colors to the details on the shell. From only silver in the second WIP, this is the final outcome after adding some gold, metallic purple, panel lining and a layer of Future.

Tuesday, December 15, 2015

D-Style Gustav - WIP 2

Just keep trying, trying, trying

After some deep thought about the dilemma faced in WIP 1 and having a break from RG Exia again, I have decided to paint the shell and use both markers and paints to paint the details. I guess I will have to be extra careful when painting the details.

The first part I attacked was the pistons found on the shell.

Pistons to be painted gold and silver

Tuesday, December 8, 2015

D-Style Gustav - WIP 1

Dilemma, dilemma, dilemma
 
I will be working with the D-Style Zoids along side the RG Exia. Since the Exia is almost at the completion stage, there should not be any problems if I were to start working on this. I'm going to do something a bit different. Starting from now, I will put a scanned image of the box art.
 
There are a few reasons which made me thought of doing this: 1) Able to appreciate the box art, 2) Able to help If anyone wondering how the box looks like, 3) If I'm going to do some painting, I can use the box art as a reference.

Front of the box
Related Posts Plugin for WordPress, Blogger...