Showing posts with label Exia. Show all posts

Thursday, December 31, 2015

RG Exia - WIP 10 (Final)

 Make the last post of the year a good one
 
Usually I will end the review and WIP of the kit after going through the weapons. For this kit, I suddenly had an idea which is very obvious but did not occur to me. This post I will do some poses with the Exia. This will also give you a brief idea on how posable this kit is.
 
Usually I do not pose my kits much because 1) I do not know how to pose and 2) I'm scared of the paint chipping. Decided to tackle the first issue which is posing. What I did was follow the poses shown in the manual.
 
The first pose to cover will be the beam saber handle attached at the back skirt. Believe it or not, Exia is able to reach the back beam saber handle.

Front and back view of Exia reaching for the back beam saber
 

Wednesday, December 23, 2015

RG Exia - WIP 9

Getting ready for battle

Now that the Exia is completed, we will take a look at all the available weapons for this kit and attaching them on to the Exia. All I can say is that this kit has lots of it.

Weapons for the Exia

I did not notice that the Exia has a total of 4 beam saber handle attached. The picture above shows 6 but in reality only 2 has the peg for Exia to hold. A more in depth review of the weapons can be found in WIP 5.

Saturday, December 19, 2015

RG Exia - WIP 8

Too many of the same views 
 
Returning to work on the Exia after a short break with the Gustav. With the armouring of the Exia completed in the previous post, then only thing left to do is to assemble.
 
Exia still in pieces
 
My working process for any gunpla is the same: Work from the bottom up. Therefore the first thing to assemble are the legs.
 
Just attach the legs into the pegs are the hips. Make sure they are fully in. Do not be afraid to put a little pressure on the leg as they are sometimes tight.

Front and back

Saturday, December 12, 2015

RG Exia - WIP 7

Obstacles here and there

Coming back to work on the RG Exia while I try to figure out the dilemma for the D-Style Gustav. With the head, weapons and legs done, the next section to assemble would be the chest and waist.

Pieces for the chest

I would like to point out some difficult parts I encountered during the assembling process. The first issue are the front and rear skirts area. The pieces are a bit tricky to assemble. Not only they are small but the way they go together really test out your patience. Just remember to keep calm and all will go well. It took me some tries before I finally got it in place.

The other issue I encountered was the loose 'antenna' on the chest. It does not stay in place and it always wants to be folded down. The hard part is you will need something sharp to hook it up. The last issue I encountered will be the GN drive. This is not really an issue but just something to be on the lookout for.

Saturday, December 5, 2015

RG Exia - WIP 6

 A change of heart
 
This will be the first time I will be assembling the inner frame for the RG line.
 
Inner frames ready and waiting
 
The inner frame when put together makes Exia looks anorexic.

Wednesday, December 2, 2015

RG Exia - WIP 5

Plated parts finally revealed
 
With the work for the MS completed in the previous post, this post will be about the weapons and the highly anticipated plated weapons.

Since there is no inner frame to work with, the first work to be done with this kit is to panel line the pieces and start the decaling process after cleaning the excess panel line.
 
Left: Pieces after panel lining
Right: Excess panel line cleaned and  pieces decaled

Since the work for all the parts are now officially completed, I will show the pilot or the 1/144 scale Setsuna F. Seiei.

1/144 scale Setsuna

Saturday, November 28, 2015

RG Exia - WIP 4

Confusion leads to mistake

On to the next and final part for the RG Exia (excluding the weapons) after completing the body.

Parts of the hand
 
With all the nub marks removed, inner frame of the hand is actually very simple. All you have to do is to remove the wrist which is the same process as the RG RX 78-2. After removing the wrist, just bend the inner frame up to lock some pieces together and viola! A completed inner frame.
 
The only difference between this inner frame and the one with the RG RX 78-2 is that the Exia inner frame requires a foil sticker followed by the clear blue transparent piece.

Tuesday, November 24, 2015

RG Exia - WIP 3

The Fantastic Four
 
Mentioned in the previous post, the waist and the chest are next. Original plan was to do both the waist and chest in different post but when I looked through the manual, I found it pointless to do them separately.
 
Tools on stand-by for the nub removal process for the waist and chest parts
 
With all the nubs removed, the next stage is to assemble the inner frame.
 
Top 3: Chest inner frame
Bottom 3: Waist inner frame
 

Wednesday, October 28, 2015

RG Exia - WIP 2

Not the usual process and procedure
 
Work for the head will start after the completion for the work on the leg. I know the head is usually left last to signify the end of the build but I was afraid that the same incident like what happened to the RX 78-2 will happen to this kit. So to put my mind at ease, I decided to build the head first.
 
The first piece I picked up to clean the nubs was the V-fin. I was surprised at how large the nub mark was.
 
My, what big nub you have?
 
This does not make sense because the V-fin is so small. Why did the designer have to design such a big nub mark for such a small piece? The thoughts that went through my mind was the designer was either drunk, too tired or had just developed some eye sight problem.

Tuesday, October 27, 2015

RG Exia - WIP 1

An old highly anticipated gunpla
 
Decided to start on another RG kit since the completion last RG kit was in March and I feel of having an OOB built to distress from working on the PG Red Frames. Was looking through the backlogs to see which kits I would keep and which to sell. That was when I saw this RG and decided to build it since it was famous for being the First RG to have plated weapons. Do you know which RG I'm referring to? It is none other than the RG Exia.
 
Manual and tools prepared for the build

Sunday, June 8, 2014

Loot #3

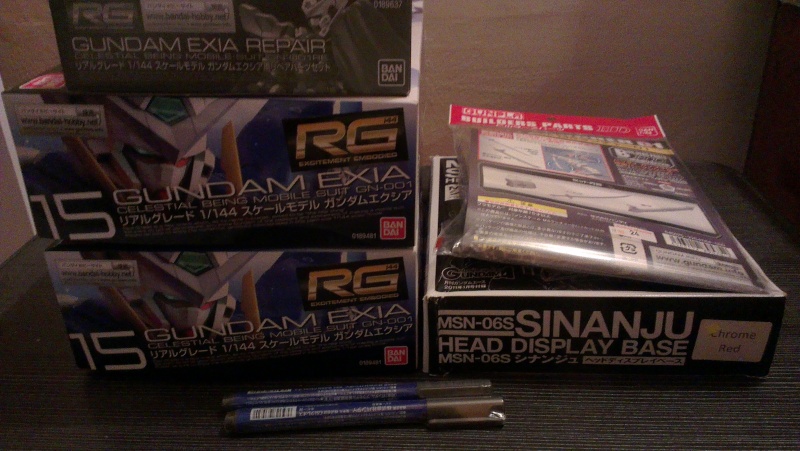
Got these today:


Got 2 Exias instead of one. Actually only planned to get one but when the shop called to inform that RG Exia has arrived, they asked if I was interested in the Exia Repair pack as well. Since this is a P-Bandai Online Hobby Shop Exclusive item, I said yes because I did not pre-order it when it was open. I guess they ordered extra for members like me who missed the pre-order date. After the call, was thinking if I should get another Exia to have is displayed as Exia Repair. Called the shop and asked if they have another Exia to reserve for me. The rest as they say is history.

Related Posts Plugin for WordPress, Blogger...