Showing posts with label 1/60. Show all posts

Tuesday, October 11, 2016

Updates (19)

A little update and loot
 
A little update since there are no updates recently. Mentioned in a post in March, I had 4 things I plan to do this year. I have completed 2 1/2 out of 4. Why is there a 1/2 and which did I complete? Let's start with what I have completed first.
 
Remember the 2 conditions which I need to fulfill in order to get a promotion?
 
i) Passing the audit - Done
I recently had the audit from 27 August - 30 August. It was my first time handling the audit but luckily it turned out okay. The passing mark was 80% with no more than 5 major findings. I got above 80% and 5 major findings. Barely scrape through but a pass is a pass.

Saturday, September 26, 2015

PG Astray Red Frame - WIP 5

Missing caps here and there
 
I know I mentioned in one of the previous post that all work on the Red Frames will come to a halt. I figure I might as well complete what I was working on before my work schedule went bonkers. This way in future I won't have to try and figure out what I was working on and what was my idea for this kit when I decided to stop. I know that I should be working on the smaller kits instead but I promise that after this, I will either concentrate on them or start another small kit. Why another small kit? Well, if you compare any other kits (other than Mega Size) to this, all other kits are small. ^_^.
 
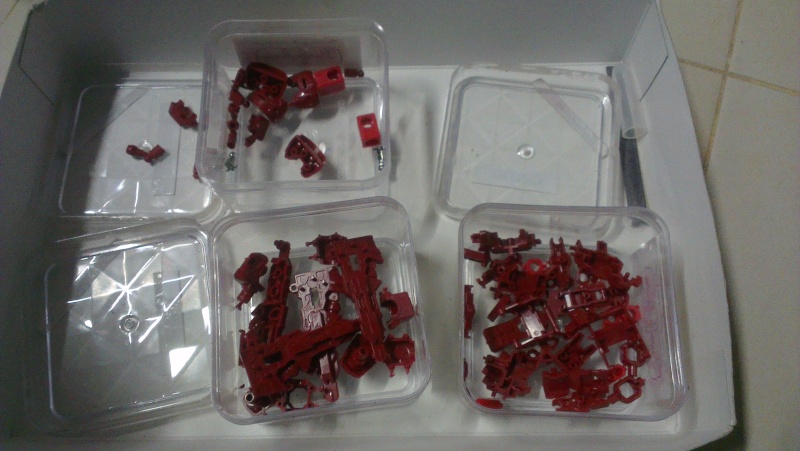
Back to the main purpose of this post. Since the inner frame of the upper legs was completed, the next work to be done will be the inner frame of the lower leg.

Parts of the lower legs separated into their respective color boxes

Saturday, July 18, 2015

PG Red Frame - WIP 7

Remember what happened the last time...
 
Back to working on the Red Frame after reviewing Roar. Since the katanas were completed, the legs for the Red Frame will be the star of this post. I will use the same concept when I was building the legs of the Blue Frame i.e. splitting the legs into two sections: upper and lower legs.

Work will begin with the upper legs first. Parts of the legs were split into their respective boxes according to the color they will be sprayed in. I started on the gold parts because they were the least amount of pieces to work on.

Gold pieces for the upper leg

Some minor detailing, panel lining and a layer of Future was applied to pieces when the paint was dry.
 
Gold pieces of the upper legs waiting for the Future to dry

Tuesday, June 16, 2015

PG Red Frame - WIP 6

A little comparison doesn't hurt
 
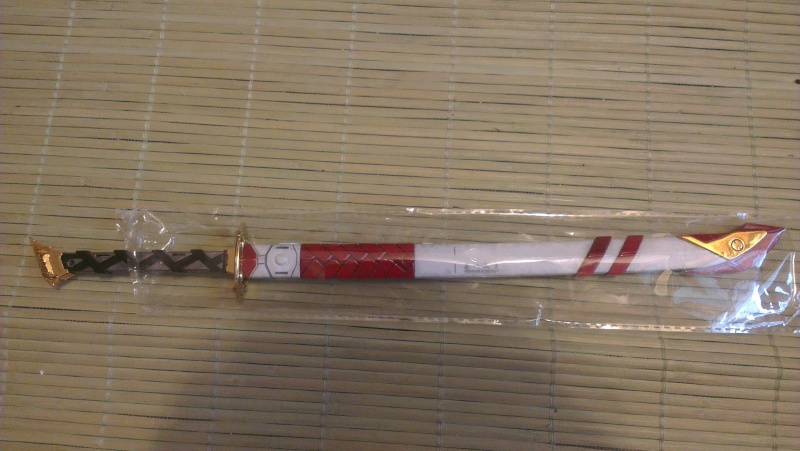
Since the metal katana and the Daban katana are at the same place at the same time, I thought it might be a good time to do a quick comparison between the two.
 
Left: Length comparison between the plastic (left) and metal (right) katana
Right: Details at the pommel
 
Left: Metal (top) and plastic (bottom) katana handle
Right: Details of the guard between the metal (left) and plastic (right) katana
 

Thursday, June 11, 2015

PG Red Frame - WIP 5

A display for something exquisite
 
With one set of the Gerbera Straight (Daban) done, I should start work on the second set but I could not bare to see the completed katana in the a plastic. Makes the Gerbera Straight looks like it has been abandoned. 
 
Completed Gerbera Straight kept in a plastic
 
The katana should have a place where it can be displayed to show its full glory:

Sunday, May 24, 2015

PG Astray Red Frame - WIP 4

Extra care is given to the process of making the katana
 

With the completion of the legs and waist of the ABF and only the feet for ARF, it is fair to start work on the ARF. By the way, I have been given a dateline by my missus to finish both kits and tidy the room. Dateline: 30th November 2015.

Instead of starting with the legs, I went and start work on the katanas instead. This is the main reason I fell in love with ARF in the first place. What is sexier than a mecha with katanas. I am planning to make one of the sheath to be a darker color scheme (hopefully) than the other to differentiate between the Daban and BanDai version of Gerbera Straight.

Wednesday, May 20, 2015

PG Astray Blue Frame - WIP 7

Can I have some more, please?
 
One leg was completed in the previous post while waiting for the paint on armor of the other leg to be dry. Once they are dry, the assembling process can begin. This is the leg where the peg of the knee is broken. I did not manage to find a solution to that problem so will just leave it as it is and manually move the knees if I were to do any poses with this kit.
 
Completed legs of the ABF

Tuesday, May 12, 2015

PG Astray Blue Frame - WIP 6

Difference in size is very obvious
 
After taking a short break to do a review on Transformers ToyWorld TW-D02: Muddy, I am back to continue working on the PG ABF. Mentioned in the previous WIP, the white parts were given a coat of pearl white from Anchor brand spray can. The color did not come out as expected. I was hoping it would be something like the pearl coating on the PG Wing Zero Custom but it came out like as though it has glitter on the parts. I don't think it can be seen in the photo but it is very noticeable when you look at it in person.
 
It took some time for me to get use to the outcome and when that happens, I'm liking how the white looks with the candy blue. Now that the armor parts are done, this will be the first time putting on the complete armor for this PG. I do hope it comes out nice.

Sunday, April 26, 2015

PG Astray Blue Frame - WIP 5

Sexy legs with tons of armor parts
 
Since the upper leg was completed in the previous WIP, this post will be concentrating on the lower leg and finally putting both together to see how it will turn out. All the parts of the lower leg inner frame is lined up to confirm that there are no missing parts.
 
Parts of the lower leg inner frame

Saturday, April 18, 2015

PG Astray Blue Frame - WIP 4

Too much bending is bad for the joints

In WIP 3, the foot armor was left in the undercoat silver. Having decided to do a Blue Frame, I picked up the candy blue spray from a hardware shop nearby and started painting the armor parts.

Parts waiting for the paint to dry
 
Also mentioned in the previous post that leg will be split into 2 sections: The upper and lower leg. This is to not mix up too many parts together. Another reason is my box is not big enough for all the armor and inner frame parts to go in. By doing this I get to reduce the workload and hopefully don't get burnout too soon.

Saturday, April 4, 2015

PG Astray Blue Frame - WIP 3

Another set feet?

As the feet for the Red Frame was completed in previous post, it is now time to work on the feet for the Blue Frame. The inner frame will be the same color except for the pipes and thrusters. By doing it this way, I will be able to differentiate between the two models without keeping them in separate boxes. The color of the armor will also be different. I have decided to go with the Blue Frame because I already have the TA ready. Suggestions are still welcome until I start painting the armor.

Ran into some minor fitting issues while assembling the feet. The pieces are hard to snap together. They do go well together once they are in place. Just need to use a bit of force to close them properly. Also make sure that the parts assembled are correct else you will have a fun time trying to disassemble them.

23 parts for the feet

Friday, March 27, 2015

PG Astray Red Frame - WIP 3

Impossible task ahead
 
From this post on I decided to split the title to PG Astray Red Frame and PG Astray Blue Frame as opposed to PG Astrays. This might seem redundant because both kits are PG Astray Red Frame but in the long run it will make an easier reference.

Mentioned in the previous post, the other RF has arrived. I'm thinking of building both RFs together meaning I will be building double of everything. I might be crazy but I think this is the way to go for this project. Besides, I need to clear space before the Mechanicore Deepstriker arrives later this year. With that being said, I will need lots more paints and time to complete the kits.

Plus side to this craziness is I will have to stop this project sooner or later to replenish my paint stocks or to prevent burnt out from working on 2 pg kits simultaneously. When I stop, I can do other smaller kits to clear even more space. Another plus side is I can do a direct comparison between the BanDai and Daban RF. This is like killing 3 birds with one stone.

Sunday, March 22, 2015

PG Astrays - WIP 2

Unsteady pilots

Mentioned in the next kit post few weeks back, I have decided to get a 2nd PG Red Frame just for the accessory (mainly the Gerbera Straight). The kit has finally arrived and I'm more excited than ever because now my RF is able to carry 2 sheath instead of one. For now I'm still pondering on what frame to paint the other RF to. Blue, Green, Gold? Blue would be more suitable because the 2nd RF kit comes with a free 1/60 TA. While thinking about a new color scheme, I decided to paint the pilot figures first before embarking on the MS.
 
Why did I choose to paint the pilot first? I decided to join a Pilot Painting Contest hosted by DC23. The prizes are attractive. GreatToysOnline.com will be shipping a couple of Gundam Metallic Nano Puzzles, myhmshop.com will be shipping a HM135 0.3 nozzle airbrush and Don himself will be shipping a set of Vallejo Acrylic Paints.

Sunday, March 15, 2015

Secret kit - WIP 1

Secret kit revealed
 
Mentioned some post back that I have this urge to start building this particular kit. I also mentioned that 'I have all the necessary materials ready. There is this one particular accessory which I'm thinking whether I should get. If yes means I have to get another kit but the kit can be painted in another color scheme. Still undecided if it looks nicer with one or two. One thing I can say it that this will be a big kit'.
 
Did you manage to figure out what the next kit will be? The next big and I mean big project is none other than.....

Friday, December 19, 2014

PG Unicorn Gundam LED Installation

Let there be light

This will be the final part of the PG Unicorn. Here the folks from HLJ shows how to do the LED installation for the PG Unicorn. This seems to be the most complicated LED installation. The good part with the LED installation is that the wiring are already pre-fixed. All we need to do is to put it in their respective places and fix the connectors together.

The installation of the LED is different from the PG Wing Zero Custom where you will have to actually put the wire through the body and terminate it at the backpack. From the video, you can see that Bandai has really put a lot of thoughts to this kit. There are areas in the inner frame to hold the wires in place.
 
Anyways, here is the final video for the PG Unicorn so sit back and enjoy.
 

In case you missed the WIP of the PG Unicorn below are the links:

Part 1 - Videos, videos and more videos
Part 2 - Final parts

Thursday, December 4, 2014

PG Unicorn WIP video - Part 2

Final parts

I have linked 6 videos on the WIP of the Perfect Grade Unicorn in Part 1. Here I will share the final 2 videos for this year's highly anticipated kit. If there is one word to describe this kit it would be Awesome.
 
After viewing all the videos, I'm sure those of you who have pre-ordered this kit can't wait for the release date and start building. For those who could not get this kit, I hope watching all the videos would satisfy you as it did me. Anyways, enjoy the last two videos.

Monday, December 1, 2014

PG Unicorn WIP video - Part 1

Videos, videos and more videos

Hobbylink.tv got their hands on an early PG Unicorn and they are kind enough show the WIP for this kit. They  are releasing one video a day and each video contains a part of the build. There are currently 6 videos on this kit so far. Part 6 completes the unicorn build and I'm guessing Part 7 will be the weapons and Part 8 will be the final part with the transformation of the Unicorn.
 
Each video is about an hour long so sit back and enjoy.

Part 1:
 

Monday, November 24, 2014

Perfect Grade 1/60 Unicorn transformation

So that's how they do it
 
There are more updates available regarding the PG Unicorn. First off are more photos of this highly anticipated kit.
 

Sunday, November 23, 2014

Perfect Grade 1/60 Unicorn photos and runners

Unicorn ! Unicorn Everywhere!
 
Here are more photos of PG Unicorn. The more I look at the photos the nicer Unicorn is. I feel the best mode to display is to get 3 Unicorns and display them each in their individual form. Now the question is who is willing to get me those Unicorns.
 

Saturday, November 22, 2014

P-Bandai PG 1/60 Unicorn Gundam Full Armor Part Set

More Unicorn goodies...
Mentioned in the previous post, there is a P-Bandai PG 1/60 Unicorn Gundam Full Armor Part Set. The F.A. set was displayed at the Gunpla Expo World Tour 2014 (Japan).
 
Release date: Jan 2015.
Price: 7020 yen.
 

Related Posts Plugin for WordPress, Blogger...