Another mystery solved!!
While waiting for the super glue to dry on the Zaku, work has started on the Gyan.
Parts of Gyan waiting to de-nub
The moulding for Gyan is worse than the Zaku. There are lots of excessive plastics which needs to be trimmed off. On top of that I found a flaw in the moulding process which I don't think will affect the kit in any way.
Flaw in the moulding
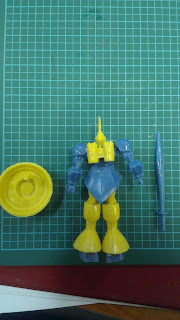
I'm also curious to see if the scale of this model kit is the same as the Zaku. The only way to do that is to do a quick snap fitting...
Front and back of Gyan
...and measure the height. From the boxes on the cutting mat, we can calculate that the height of the Gyan is about 8.5 cm. Once again we have to convert cm to inches thus getting the height of 783.46". Getting the height of 19.9 meters for Gyan from Gundam wikia, we once again use the scale calculator to get the scale of this model.
Scale for Gyan
The scale for the Gyan is 1:234.4. I would have thought that both the scale of the Gyan and Zaku would be the same but I was wrong. Like the Zaku II, Gyan comes with 2 weapons. The shield and beam sword.
Front and back of the weapons
As can be seen in the pictures, the shield is moulded in yellow. In order to get the red at the outer part of the shield, I would have to either hand paint them or use masking technique and mask off the yellow parts. Guess which method was used? Masking.
Masking of the yellow part of the shield
What I did was use a normal cellophane tape and covered the top part of the shield. The access tape was slowly cut away with a hobby knife. Just make sure that all the edges of the mask are fully in contact with the surface. If not, paint will seep through and more work will have to be done cleaning.
While preparing all the parts of Zaku and Gyan for painting, I notice something has happened to the sticker provided with the Zaku.
Front and back of sticker
The stickers are coming apart and the glue has dried up. Luckily I'm not planning on using any of them so it is not a loss to me. After getting some satay sticks and crocodile slips, parts are attached to it and went to the spraying section.
Gyan and Zaku parts waiting to be painted
No pictures were taken during the spraying process. I was too excited on seeing how effective the masking of the shield went so the first thing I checked on when the paint was dry is the shield.
Left: With mask
Right: Mask removed
I'm happy with the result of the shield. When the paints are dry, I tried my hand on hand-painting the details. I used 2 colors for hand painting: Mr. Metallic Color GX Red Gold and Mr. Metallic Color GX Metallic Black.
Mr. Metallic Color GX Red Gold (left) and Mr. Metallic Color GX Metallic Black (right)
A small brush was used to paint the gold energy pipes on the Zaku II. The Metallic Black was painted by a slightly larger brush because of the area it has to cover. Thinner was also used to thin the paint to achieve a smoother and even finish.
Left: Gold details painted
Right: All details for both kits painted
Now to wait for paint to dry, give them a layer of matt finish and start the assembly process. I hope that the repair work done to the Zaku II is strong and the glue fully cured when I attach the hands to it.


No comments:
Post a Comment