Tuesday, January 28, 2025

SD RX 78-2 - WIP 5

 The difference is clear as day

Going back to assembling the SD RX 78-2 build after what happened in the previous Z-Knight post. Did not expect to get back to assembling this kit so soon since I last completed it a week ago.

All the pieces re-arranged according to colors instead of sections

[Weapons]

Pieces of the beam rifle

   
Assembled beam rifle. The scope is able to rotate 180°
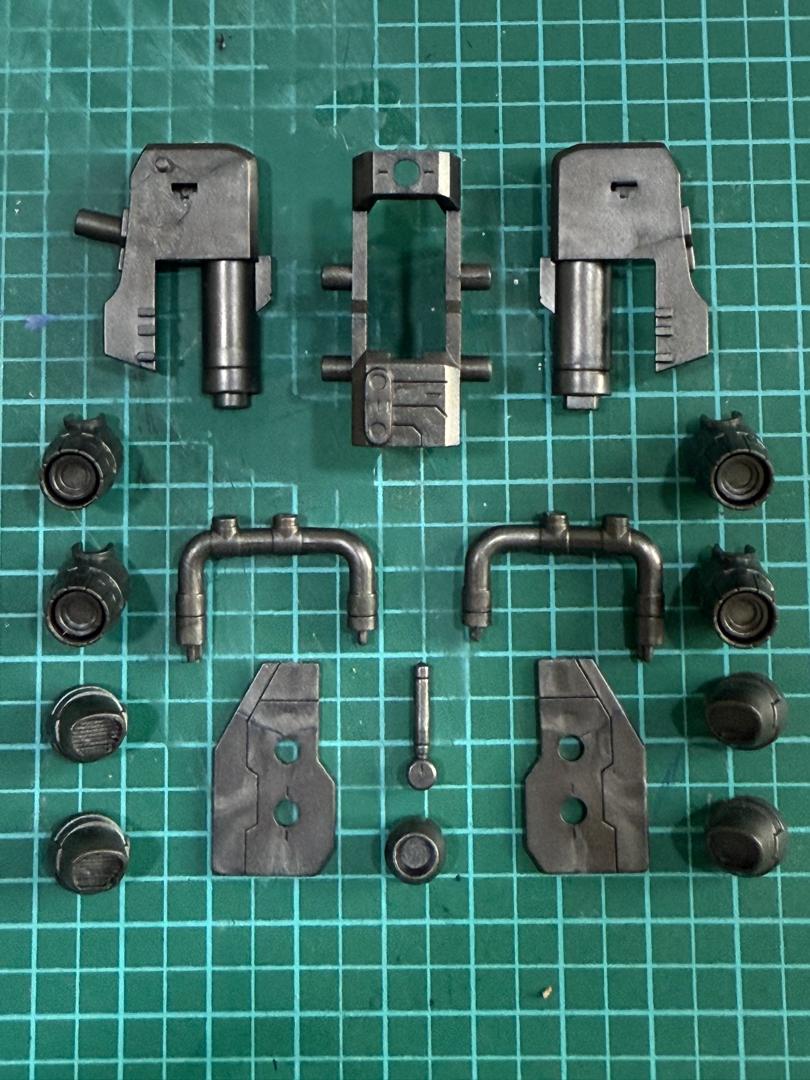
[Feet]

Pieces of both sides of the feet

Completely assembled feet with stickers applied

   
Left and right sides of the feet

There is an issue with the polycap as one of the feet are loose. This could be an error on my part as I reused the polycaps from other kits and may have used the wrong one even if it looks the same

[Waist]

Parts of the waist

   
Assembly of waist is straight forward

[Chest]

Parts of the chest piece

   
The top and bottom of the chest. Is a shame that the details on the bottom will not be seen

The front view of the chest unit. Fitment for the chest vent is tight and scratched off a bit of the blue paint but luckily it is not visible

The arm connectors are able to move individually front and back

[Arms]

Pieces of the arm waiting to be assembled. Even the SD uses polycaps as the connection between the upper and forearm unlike Z-Knight

   
The completed arms. For those eagle eye reader and notice the error in the assembly leave a comment "I know" below

   
The hands are able to bend about 45° upward

[Head]


360° view of the head

Top view of the head. From this angle one can clearly see the different white which was used in Part 2

This is the end of the post. Will be going back to working on the Z-Knight and hopefully able to finish it without any more issues. Next post for the SD will be assembling all the sections together, some action poses and conclusion of this kit.

Saturday, January 18, 2025

HMM Z-Knight - WIP 4

 Another Broken Piece

A continuation of the Z-Knight build after a short intermission with the SD RX 78-2 build and the Blokees Transformers Grimlock. A short recap of the progress of this kit. The head, waist and chest were completed last year. Mentioned before that working on this kit made me a bit frustrated and did not experience the joy I had when working on the Burning Gundam and Shield Liger. Hoping the break would reset my mindset and get me through this kit.

Will start the post with the backpack.

[Backpack]

Parts for the backpack. Metal Black will be the main color to be used

Did a sample paint for the thrusters. Used Vallejo Aluminum and Bronze but the bronze did not turn out nice so removed and replaced with Dark Aluminum instead

All the thrusters painted

Painted one of the nozzles with the Super Italian Red but opted for an easier route...

...by using the red glitter pen

Easier and less stressful for someone with shaky and big fat thumbs like me

Panel lined with Vallejo Aluminum to make it stand out

Painted the pipe with Vallejo Dark Aluminum and the connection point with Super Italian Red

The same red was also used for the bottom band of the backpack

All the work done for the pieces of the backpack

The thrusters are the first to be assembled

The backpack frame with all 4 thrusters

Attachment of the thrusters to the backpack

   
The thrusters are able to move up and down independently

   
Front and back view of the fully assembled backpack

   
Did not like the red showing at the sides. Painted it over with metal black to make it seem like a single piece

Top view of the completed backpack. The silver in the middle was painted before the assembly

[Arms]

   
Left: Parts to be painted in A.E.U.G. MS Blue
Right: Parts to be painted in Vallejo Aluminum

Parts to be painted in metal black. There were 2 pieces of red which were painted while I was working on the SD RX 78-2

All the pieces for the upper arm


The joints are attached with plastic parts instead of polycaps. The parts are tight to move due to the paint but still able to swivel 180°

Guess this would be coming sooner or later. The tight bends put a lot of stress on the plastic which broke

Tamiya cement and Mr Cement S to the rescue again

The silver part of the forearm. Did some detailing work on a few of the parts

Silver armor with the upper arm. Permanently cemented the upper arm at an angle

   
Completed arm. Replaced the metal black for the vent in the above photo with red to make it stand out

The blue armor parts to be attached to the silver but before that can happen...

...need to assemble the armor. The armor pieces are stacked up on one another

   
The end part of the arm armor is able to swivel up 90°

[Shoulder Armor]

   
Decided to paint the shoulder rockets in metal black instead of the blue to show that it is a mechanical part and not part of the armor. Followed the similar paint scheme as the head with Vallejo Aluminum as the band

   
The shoulder rockets(?) were painted red with Monami Accent Red Marker and the surrounding area was painted with Vallejo Dark Aluminum

Pieces for the shoulder armor


Completed shoulder armor with the rockets attached

[Hands]

There are only 2 static hand options: open or close

Completed hands

[Hand Assembly]

All the pieces for the hand assembly


Repeat for the same steps (except breaking the piece) and we have both arms assembled. Next will be working on the legs and finally the weapons. This is one build I really want to get it over with as soon as possible due to all the unpleasant experience.
Related Posts Plugin for WordPress, Blogger...