Thursday, March 31, 2016

LEGO Star Wars Microfighters Resistance X-Wing Fighter - WIP 2 (Final)

Accelerate to attack speed

Continuing the build of the LEGO Microfighters X-Wing.

In WIP 1, the pilot and the main body of the X-Wing has been completed. In this post, we will look at assembling the wings, attaching it to the body and showing the gimmicks.

Step 19: First step of assembling the wing

Front and back (right) view of one of four wings

2 completed wings

It takes a total of 8 steps to complete half of the wings. It is interesting to note how both the wings are attached to the body.

Friday, March 18, 2016

LEGO Star Wars Microfighters Resistance X-Wing Fighter - WIP 1

First of its kind (on the blog)
 
I have encountered some problems with the decals while working on the Eggplane YF-19. To stop the frustration and to cool down, I decided start on another small and a much simpler kit. Let us welcome: LEGO Star Wars Microfighters Resistance X-Wing Fighter. That is a mouthful so I will just refer to this set as the X-Wing.
 
Front view of the box
 
Back view of the box
 

Saturday, March 12, 2016

Updates (16)

Busy, busy, busy
 
Just a little heads up on what will be happening to this blog and also to my life. Somehow I had a feeling that this year started a little bit different than the rest. Before I talk about what will be happening to the blog, let me first explain what will be happening in my life for the year.
 
All was fine until after Chinese New Year. This is where some of the things which I wanted to do or in planning stage became a reality. Let's take a look on what I have on my plate for this year:

Sunday, February 28, 2016

Eggplane YF-19 - WIP 5

Decaling does make a difference

Mentioned in WIP 4, this post will be about assembling the Fold Booster and decaling the plane.

Parts for the Fold Booster
 
With a little bit of glue (Mr. Cement S), the pieces are assembled.
Top and bottom view

Saturday, February 27, 2016

Eggplane YF-19 - WIP 4

 Lots and lots of gluing required
 
With the D-Style Gustav completed, it is time to assemble the eggplane after all the paint job done in WIP 2 and WIP 3.
 
Parts for the main plane compartment

The parts which is missing from the picture above are the clear red pieces which was modified in WIP 3. Before any assembling can start, the first order of business is to glue the two grey pieces together.

Thursday, February 25, 2016

D-Style Gustav - WIP 8 (Final)

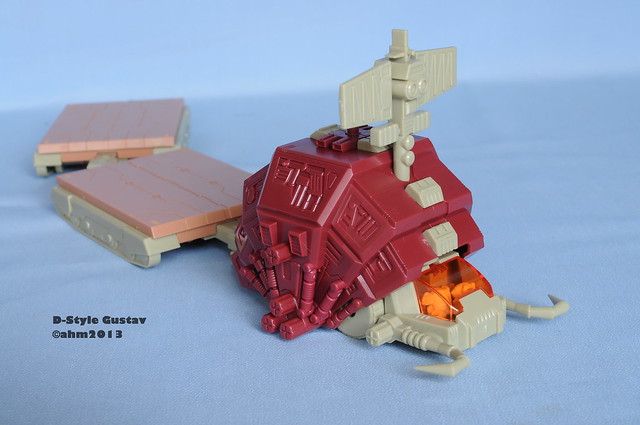
Transport ready and waiting
 
With the platforms completed in WIP 7, let us link both together and connect them to the Gustav which was completed in WIP 6.

Linking the 2 platforms together is as easy as ABC. Just attach the peg into the hole and you are done.

Both platforms linked together

Platforms can be moved up or down
 
The same method is used to connect the platforms to Gustav.
 
Gustav connected to the platforms
 
A little comparison between the original (right; Image taken from flickr) and the painted Gustav


Top and aerial view of the completed Gustav 
 
To conclude this review, below is a list of all the pros and cons and the conclusion of what I think about the kits according to my personal experience.

Pros:
+ Lots of details
+ Cute
+ Includes pilots
+ Moving wheels

Cons:
- Huge nub mark at the front
- Loose pieces
- Requires glue

Conclusions:
Overall, this is a nice and fun side project. There are a lot of details on the shell and at the platform area if you are willing to spend some time coloring them up. There is nothing much to be said about this kit. There are no articulation involved. The good thing is that the wheels do move.

While assembling this kit, it is best to have the hobby cement on standby. Not sure if I bought a faulty kit or if this is happening to other modellers as well. This is not a big issue though. Just be careful on where you hold the piece while putting the cement. 
 
All in all, I would highly recommend this kit. This is also a good kit for wetting your toes if you are planning to have some hand painting and masking practice.

All WIPs for the D-Style Gustav:
WIP 1 - Dilemma, dilemma, dilemma
WIP 2 - Just keep trying, trying, trying
WIP 3 -  Adding a little color here and there
WIP 4 - To paint or not to paint?
WIP 5 - D-style pilots
WIP 6 - Escargot anyone?
WIP 7 - Here comes the train
Related Posts Plugin for WordPress, Blogger...